
Easy Bread Rolls Recipe
Easy bread rolls recipe! Made from scratch with store cupboard ingredients, these tasty, bake at home bread rolls are perfect for serving up at a dinner party or alongside your soup. Made in a traditional yet simple way theres no bread machine or dough hook here; just simple bread-making, from scratch, using your hands.
Servings 8 rolls
Calories 113kcal
Ingredients
- 150 ml (⅔ cup) warm semi-skimmed (2%) milk
- 1 tablespoon Olive oil
- 1 teaspoon Caster sugar
- 225 g (1 ½ cups) Strong white bread flour
- 1 teaspoon Crushed sea salt
- 10 g Fresh yeast or 7g (2 ¼ tsp) sachet of dried yeast
- Extra oil for oiling work surface and bowl do not use flour
- 1 egg and a splash of milk for glazing
- Poppy seeds or sesame seeds to decorate optional
Instructions
- First, gently warm 150ml of semi-skimmed (2%) milk to body temperature (37°C), either on the stove or in the microwave. Test temperature with your finger. If it feels too hot allow to cool before using.
- Next add 1 tablespoon olive oil and 1 teaspoon caster sugar to the milk. Then add the yeast and stir gently to dissolve. Leave for a couple of minutes to allow the yeast to activate. TIP: if using fresh yeast gently rub it between your fingers, once its in the milk, in order to fully dissolve.
- Next sieve the flour and salt together into a large mixing bowl. Mix well using tips of fingers or a whisk.
- Next add the milk and yeast mixture to the flour a little at a time (add ¾ initially) and mix using finger tips or a wooden spoon. Add enough liquid until it starts to come together and forms a nice sticky dough. Be careful not to squeeze the dough with your hand as it starts to come together. Ensure you incorporate all flour from bottom and sides. Gradually add remaining milk making sure all the yeast has been added. Use luke warm water if more liquid is required (better to be too wet than too dry).
- Drizzle a bit of oil on a clean work surface to prevent the dough from sticking. Turn the dough out onto the oiled work surface and knead for 10 minutes by hand until smooth and elastic. TIP: test if the dough is ready by rolling into a ball then press into the centre with your finger. The dough should give an exaggerated bounce back.
- The 1st prove: Place the dough in a lightly oiled bowl and cover with cling film and leave in a warm place to double in bulk, this will take approx. 1 hour.
- After an hour remove the cling film and hit dough firmly with your hand to knock back. This will release the built up CO2. Turn out onto the work surface and use finger tips to flatten then roll into an even sausage shape. Use a large knife to halve, halve again and halve again into 8 even pieces. TIP: If you want to be really even with your rolls you can weigh each piece to check they are the same size.
- To create the roll shape place the first piece of dough on the work surface and then place the flat of your hand on top. Make a circular motion and gradually move in your thumb and allow knuckles to rise, creating a smooth sphere. Make sure you press quite firmly in order to remove creases. Repeat with each piece of dough.
- The 2nd prove: Place the rolls onto a lined or greased baking tray. Brush rolls with egg wash (1 egg whisked with a bit of milk) and sprinkle with sesame seeds or poppy seeds if desired. Cover tray with lightly oiled cling film. Leave them in a warm place until they appear well risen (30 mins).
- Pre heat the oven to 180°C (FAN) (350°F) whilst waiting for the second prove.
- After 30 minutes you should see a rise to the bread rolls. Add a tiny pinch of sea salt to the top of each roll then bake for 25 minutes - check at 15 minutes. Bake until the bread sounds hollow when tapped on the bottom. TIP: Spraying the oven with water at regular intervals can help create a better crust.
- Cool on a rack before devouring. And don't forget to enjoy that freshly baked bread smell 🙂
Notes
Recipe tips:
Fully dissolve the yeast: Fresh yeast can sink to the bottom of the liquid and not fully dissolve. Check this by mixing with your finger tips - tracing the bottom of the milk vessel ensuring no clumps of yeast are stuck at the bottom. Mix the salt into the flour rather than the milk: Salt will add flavour to the rolls but can kill the yeast, so best to mix and disperse this in the flour before the milk is added. Use oil not flour on your work surface: When kneading the dough use oil on the work surface to stop it sticking. Don’t use flour as this will dry out the dough and a sticky dough is preferable when bread making. Even bread rolls: To create evenly sized bread rolls you can weigh each piece of dough once you have halved into 8 pieces. However, rolling the dough into a sausage and then halving 3 times is usually pretty accurate. Crusty bread rolls: To create a better crust on your rolls you can spray the inside of the oven with water a regular intervals during baking. Or place a roasting tin at the bottom of the oven and fill with water at the start of baking.Frequently asked questions:
Why does the milk need to be warm? The warm milk allows the yeast to activate. However, if its too hot (more than body temperature) it will kill the yeast. Why is there sugar in this recipe? Sugar added to the milk will feed the yeast and help it to activate properly. Yeast needs food, warmth and moisture to activate. The sugar is the food and the milk is the warmth and moisture. Why do we knead dough? Kneading is one of most important stages in bread making and provides the opportunity for the two proteins found in flour to come together and form gluten. It also allows the yeast to work its magic and release carbon dioxide (CO2). Use power from your shoulder to knead thoroughly, the dough will go slightly whiter as you knead. Stretch out to see if snaps or stretches, continue kneading until the dough becomes nice and stretchy. How long should I knead the dough? Dough should be kneaded for at least 10 minutes. You will know when the dough has been kneaded enough when it becomes stretchy and elastic. The best test is to roll the dough into a ball and then press firmly into the centre with your finger. The dough should bounce back. Why does bread need to be proved twice? Allowing the dough to prove just means to rest it and give it the opportunity to rise. Over proofing can produce unstructured or uneven bread. So the 1st prove should only be for around 1 hour. Knocking back (hitting the risen dough with your hand) removes the air meaning the dough can be handled again and shaped. A second prove allows the shaped dough to rise again, this usually requires less time (around 30 minutes). When is the bread ready? To test if the rolls are cooked through, carefully turn over and tap on the bottom. The roll should sounds hollow. Why is my bread heavy? The main cause of heavy or dense bread is a lack of rise. Bread can have a reduced rise for a number of reasons including not enough protein, not kneaded for long enough, left to prove for too long, too much salt.- Not enough protein in the bread would mean less gluten and so not as much CO2 can be trapped. The protein content comes from the flour, which is why it is important to use a flour with high protein content (bread flour).
- If the bread isn’t kneaded for long enough the gluten won’t have enough time to form and build up. In addition the yeast may not be fully activated.
- If the dough is left to prove for too long the yeast can die (over-fermentation). Its important to only prove for an hour in the first prove and then just 30 minute in the second prove. If you want to do the first prove over night you can do this if you place the dough in the fridge. The cold slows down the fermentation process.
- Too much salt can kill the yeast so stopping the formation and trapping of CO2.
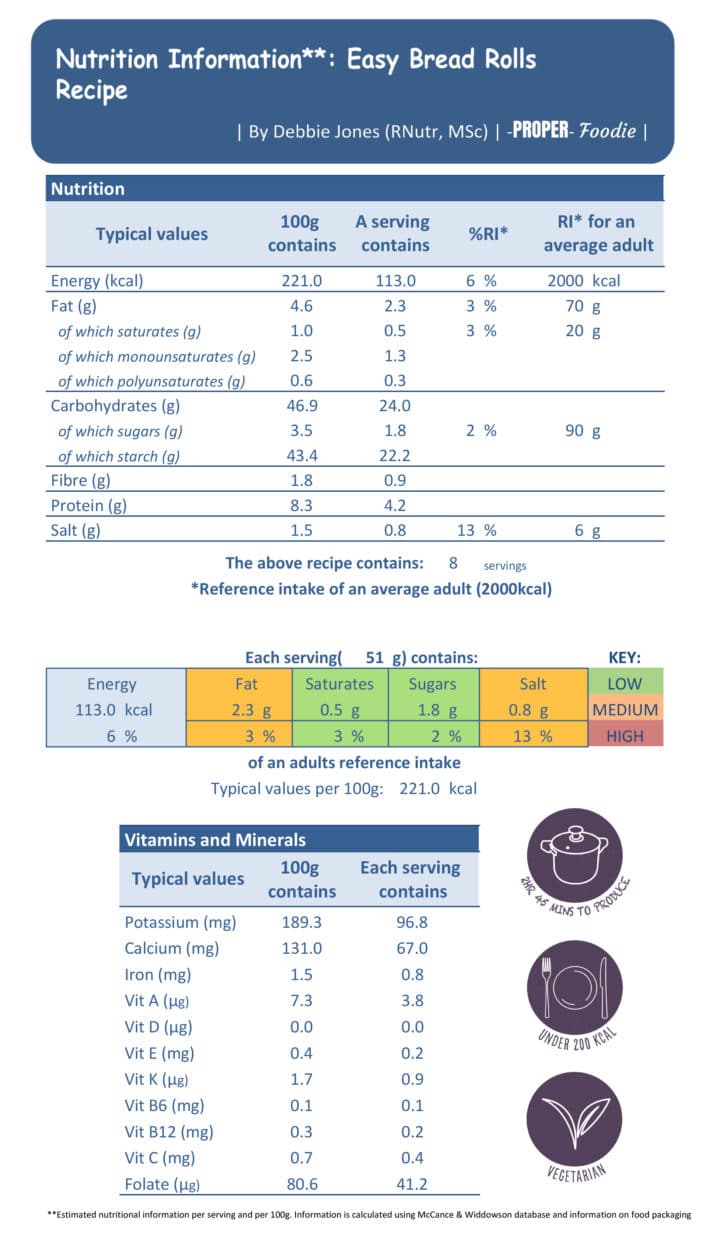
Nutrition
Serving: 51g | Calories: 113kcal | Carbohydrates: 24g | Protein: 4.2g | Fat: 2.3g | Saturated Fat: 0.5g | Polyunsaturated Fat: 0.3g | Monounsaturated Fat: 1.3g | Sodium: 320mg | Potassium: 96.8mg | Fiber: 0.9g | Sugar: 1.8g | Vitamin A: 3.8IU | Vitamin C: 0.4mg | Calcium: 67mg | Iron: 0.8mg